Written by ContentPowered.com
If you’re thinking that something called a “dark post” is going to involve some shady, underhanded technique, you’d be wrong. Dark posts are a perfectly legitimate, useful ability given to you by Facebook themselves. They’re not even traps, like the boost post button, they’re just downright useful. And, since they’re provided and sanctioned by Facebook, you can’t get in trouble for using them unless you’re directly going against Facebook’s terms of service with your content in some way.
I’m going to cover three topics here related to dark posts; what they are, how to make them, and how to use them. From there, it’s up to you to put them to use. I can’t make recommendations and give you a framework, but I can’t give you a detailed plan to follow to make them work for you – at least, not without arranging a bit of contracting on the side.
What Are Dark Posts?
Dark posts are a fancy, somewhat sinister name marketers have created for a specific type of post on Facebook. This specific type of post is just an “unpublished” post. In other words, you create a post, and the post exists, but it isn’t published on your news feed. No one in your audience sees it organically. It doesn’t trigger notifications. It’s visible to anyone with the link, but if you don’t have a direct link to the post, you won’t be able to find or see it.
These posts are easy to create and tricky to use. After all, what’s the value of a post that doesn’t show up? You have 0 organic reach, and the only people who can see it are people who have a link. That means you need to share the link somehow, but you can’t just do it by sharing the post; since the post is invisible, you need people to click on your link.
If you’re thinking “why would that be useful?” you’re not alone. The number one reason people don’t use dark posts in their marketing is because they don’t know the system exists. The number two reason is, despite knowing they exist, not being able to grasp why they’re useful. On the other hand, if you already have a few ideas of how you can put them to use, take a moment to write them down. Treat this like a test; if you guessed the strategies I’ll recommend, give yourself a cookie.
Dark posts have existed since at least April 2013. They are not, however, a publicly available feature. If you want to use them, you’re going to need to go through Facebook’s toolbar app, Power Editor.
How to Make Dark Posts
The first step to making a dark post, then, is to obtain Power Editor for yourself. Power Editor, if you don’t already know, is a plugin for Google Chrome – and Chrome only – that gives you access to a bunch of new beta options in the Facebook ads system, as well as making some systems easier to access and use. It’s designed for advanced marketers, so it doesn’t hold your hand, but it’s still pretty easy to learn. As long as you’ve ever made a Facebook ad before in your life, you should have no trouble with Power Editor.
It used to be that Firefox and Chrome were close enough in structure that you could use Power Editor with Firefox as well. Since then, the two have diverged, and Power Editor now only supports Chrome. So, if you don’t already have Chrome, download a copy of that. You can find it here.
Once you have Chrome installed, visit this page on the Facebook website. You will be asked to log in if you haven’t already. From there, you’re already sitting pretty at the Power Editor dashboard. It’s a fancy way of looking at the ads system. On the left in a bar you can see a folder with a check – that’s your ad campaigns. Under that is a four-folder icon, that’s your ad sets. Beneath that is an individual box for ads. You can easily browse your ad campaigns from this setup.
If you’re not sold on Power Editor off the bat, you really should take a bit to familiarize yourself with it. Once you do, you’ll be surprised at how valuable it can be.
- You gain access to features other users don’t. Facebook often uses the smaller, more advanced Power Editor audience to beta test advanced features. Some of them never make it out of Power Editor, like dark posts. Others roll out to the general system, but by the time your competitors get them, you’ve been using them for weeks or months. For example, lookalike audiences were first debuted in Power Editor. The same goes for saved audiences and domain sponsored stories.
- Power Editor has fine tuned control over ad placement. Rather than running wherever, ads through Power Editor can be limited to just desktop, desktop and mobile, or either specific news feed. You additionally have device-specific targeting options.
- Power Editor gives you more robust options for controlling your CPC and CPM. Some of these options have rolled out to the main Facebook ads system, but many are still limited to Power Editor.
- Power Editor is the only Facebook native tool that allows bulk editing of ads. Want to change your audience targeting across the board? Use Power Editor or enjoy doing it manually on each individual ad. It should only take an hour or so that way.
- There are other exclusive features, like purchase activity targeting, ads on Instagram, and optimized bidding all available to Power Editor users but hidden from normal users.
Now that you’re convinced, let’s look at the two ways you can create dark posts.
The first method is the old method. In the Power Editor, click on the drop-down box at the top to choose your account. This will be the personal account your page is tied to. Next, click on the “Page Posts” tab. There is a drop down box on the upper left of the left column. This is where you select the page you want to be posting the post you’re going to make. Make sure your page and the post you want to make match.
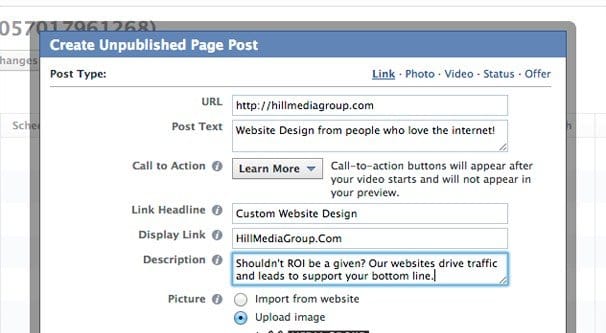
Next, click the “create post” button all the way to the upper right corner of the main box. This brings up a lightbox with post information you can specify.
- Post type. The options here are links, carousels, photos, videos, statuses, and offers.
- URL is the landing page of any post type that has a link outside of Facebook.
- Post text is the text that goes into your post, simple enough.
- Call to action is a button that appears at the bottom of the post; pick one that matches or leave it off.
- Link headline is the meta headline for the post you’re making.
- Display link is what you want the link to look like in the preview. I recommend making it just your base domain. Subdomains are ugly.
- Description is the meta description of the content you’re posting.
- Picture is the image that goes along with your post. You can either have Facebook pull it from your website according to your specified open graph meta data, or upload a specific image.
- Carousel ads have the option to add more than one image or video for the slideshow.
- Offers have expiration dates, reminder dates, terms and conditions, claim limits, and bar codes optionally usable. If you don’t know how to set these up, you probably shouldn’t use offer ads.
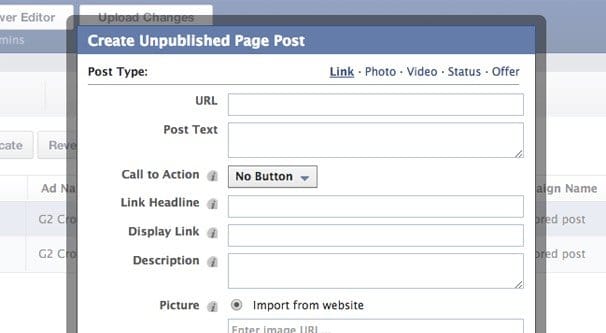
The important setting here is the radio button at the very bottom. Make sure “this post will only be used as an ad” is checked. This is what makes the post unpublished. If you post it with “this post will be published on the page” you’re just going through Power Editor to make a normal post you could have made from your page.
The second method is indicated by the yellow box on top of the window for the first method. See where it says “If you use unpublished page posts to create ads, you no longer need to”? Theyr’e telling you that you can now specify all of the appropriate data for a news feed page ad from the ad creation menu.
This is a huge help. See, when you created an unpublished post to use as a landing page for an ad, you would need to push that post live, and then go create your ad using the URL of that unpublished post as the landing page for the ad you created. This was a hassle and, if you had to copy and paste a lot, might get lost.
Now what you can do is just go to the ads creation page and make a new news feed ad. Click on the ad section of that left-hand column and click to create a new ad. On that page, specify the campaign you’re using, or create a new one. Fill in all the various details – copy, audience, limitations, and so forth – then create the new ad.
The new dark posts have one huge benefit over the old method; they’re free. You are essentially creating an unpublished post that is published for a select section of your audience. You can choose to make them completely unpublished, if you choose, and run paid ads to them. That’s perfectly fine, and in fact it’s a viable method of split testing ad copy or post landing page copy.
Now, how can you put dark posts to use?
How to Use Dark Posts
I have a handful of ideas for you, and you’re free to spin them off on your own. Remember that list you made earlier, if you made one? Now’s your chance to test yourself against the answer key.
Idea one: Split test ad copy. The idea here is to create a pair of identical dark posts, both limited to be invisible to everyone except those who have the link to the ads. Then create two different ads, each with different copy, changing whatever variable it is you want to change between them. This could be anything from image to headline to URL to targeting. Run those ads for the same length of time and the same budget, so you have an equal comparison between the two. Later, measure the metrics of both dark posts to see which ad performed better. That ad can be adapted into an ad with a landing page on your website, so it will attract people more directly.
Idea two: Test organic post copy. Split testing is the name of the game with unpublished post. You can publish two posts with the same targeting, to see which gets more engagement. Facebook’s EdgeRank will natively keep them from overlapping too much, so your audience isn’t going to be spammed by your dark posts. In fact, anyone not in the audience won’t see them at all, and the people inside the test audience will see them as sufficiently different. They won’t show up one right after the other, that’s for sure.
Idea three: Test different audience responses. This is similar to the previous idea, only you create two identical dark posts and change the targeting instead. This way you can test how an ad runs with a given audience before you invest heavily in targeting that audience. The only risk here is that some people who are in both audiences overlapping will see the post more often, but that’s not necessarily a bad thing. It just means if they engage, one side or the other will get the credit.
Idea four: Make use of rejected ads. Jon Loomer does this; when an ad is rejected and you don’t want to tweak it to be better suited to being an ad, you can just run the same copy and targeting as a dark post. It won’t have the same exposure it would as an ad, because you’re not paying to promote it, but it should still work relatively fine. Facebook doesn’t have a compunction about 20% text in organic posts, after all. It’s up to you to make it all work.
So, how’d you do? Did you have an idea I didn’t cover? Feel free to let me know.