Written by ContentPowered.com
I’ve met a surprising number of business owners and their social managers who don’t know that Facebook has a business manager, which is like the page manager on steroids. It’s designed to add a layer of management, administration, and security on top of the usual page management features.
Interestingly, among those business owners I meet who do know about the business manager, many of them feel as though it’s a tool specifically meant for huge companies. It’s true that the business manager is designed to enable large teams and the management of numerous Facebook pages all under one brand heading, but that doesn’t mean it’s restricted to just large companies. Anyone can use it, and get some benefit from it. As a newcomer to using the business manager, I’ve prepared an introduction for you.
Why Use Business Manager?
Perhaps the number one most compelling reason to use the business manager is simply focus. When you use the standard Facebook page management tools, you’re still essentially just using Facebook as your personal account. Yes, you have access to your Insights, to your Ad Manager, and so on, but you also have notifications, messages, and all the rest. It can be very distracting. Business manager, meanwhile, is a completely sequestered interface. It has all of your business assets, and none of your personal distractions. If you’re prone to getting sidetracked with Facebook while you work, it can be a godsend.
Organization is the second most useful feature. Think about how ads are structured; individual ads within ad sets, within ad campaigns. With business manager, your pages are structured similarly. You have your brand, and within that brand you have individual pages, and within each page you have that page’s assets. If you manage Facebook pages for a variety of clients, you can add them all under one business manager account to keep them all in one place. No more tedious logging in and out.
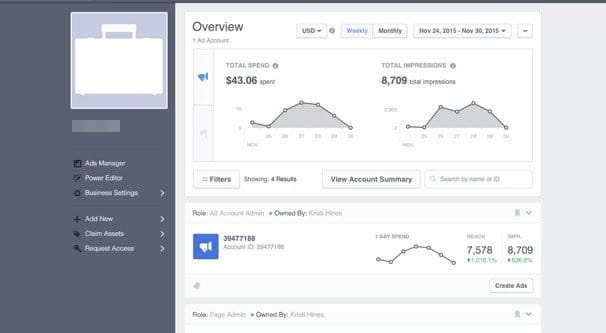
The third great feature is simply having an eagle eye view of your brand assets. You can see your pages, your ads, your team members, who is assigned to what role on what pages, and everything else at a glance.
Step 1: Set Up a Business Manager Account
Once you’ve been convinced to use the business manager, you need to go to their page and create an account. You will be asked to plug in a business name, and then your own first name, last name, and business email address. That’s it! It’s an amazingly simple process and takes, at most, 30 seconds to accomplish.
Step 2: Claim Existing Business Assets
I’m assuming that you already have a business page or two, some ads in an ad account, and a few other business assets. After all, you’re probably not reading about business manager without already having something in place. Along the left column, you will see an entry labeled “claim assets.” Click this and it will give you a sub-menu with asset types, like page, ad account, and app.
Click any that apply one at a time and go through the claim wizard to add your business pages, ad accounts, apps, product catalogs, and other brand assets to the business manager. Note: make sure you’re only claiming pages and assets your brand owns! If you claim a client page, your client won’t be able to claim it, because you claim you own it. If you’re only managing it for them, make them set up business manager and request access with your own account. Make sure to pay special attention to this when claiming ad accounts. Pages can be removed from business manager, but ad accounts cannot, so claiming a client’s ad account can be disastrous.
You can add Instagram accounts to business manager as well. This is found under the business settings menu, to claim an Instagram account. It will be added much like any other Facebook account from there, and allow you to manage it just as you would manage a page.
Step 3: Create New Business Assets
If you have always wanted a franchise page, or if you had planned a secondary page for your brand, or if you have reason to create another ad account, you can do so. Above the “claim assets” menu is an “add new” menu. Click this, and you will be shown types of assets you can add to your business manager. These include people, pages, ad accounts, product catalogs, and payment methods.
If you don’t need to add any new assets, you don’t have to worry about this. If you do, you can create them here. Business manager will do a quick setup of the asset in question, and then take you to the standard wizard for, say, page creation, to let you fill in the details as normal. It’s simply a faster and more convenient way of creating a page or other asset than logging out and creating it, then logging in and claiming it.
Step 4: Request Access to Existing Assets
Now, if you’re a social media management company, or if you’re working with other ad accounts or Facebook pages you don’t own directly, you can’t add them to business manager. What you should do is request access as an editor to those pages.
The first part of this process is to set up business manager for your clients, or make sure they have it set up already. Some will, many won’t. Just pitch it as an upgrade to your system, and make sure they have the admin level access required to own their own assets. Once they have business manager set up, use your own to find the page, ad account, or other asset you want to be able to manage. This will send a request to their account, which they can approve, or you can approve while using their business manager, whatever works for your situation.
You may have guessed, but the “request access” entry below “claim accounts” is where you go to do this. One thing to mention, though, is that Facebook will only let you have a handful of pending access requests at a time. If you’re trying to request access to too many assets at once, you’ll be unable to make more requests. I don’t know what number specifically is the cap, and most small brands won’t run into it, but it exists.
At this point, you have everything set up in one central location. How do you manage each asset individually?
Managing Assets with Business Manager
On the left-hand sidebar, you’ll see “ads manager”, “power editor”, and “business settings.” The first two are self-explanatory and allow you to access the ads system through either the default ads manager or through the power editor, as per your choice.
Business settings, on the other hand, is a list of the various types of assets you can access and manager once they’re added to your account.
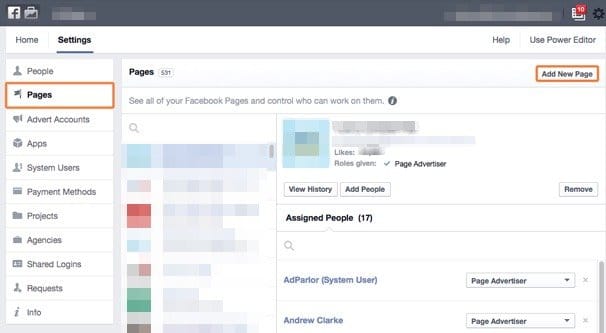
The pages option allows you to see a list of all of the individual pages you can manage, either because you own them or have been granted access to them. From here, you can view your history with the page, add people to the page, assign partners to the page, remove your access to the page, set roles to people assigned to the page, and click the link to the page.
When you click the link to the page, you are taken to what is essentially your page manager as normal, except you’re within the business manager. Depending on whether or not you own it or if you’re limited to a non-admin role, your options will be limited. You can see all of the usual metrics and tools here, and can make posts, see messages, view insights, boost posts, change tabs, and all the rest.
The ad accounts option is redundant if you only have one ad account. If so, you can simply click the ads manager or power editor options to go to it. If you click the ad accounts option and have more than one ad account, though, the real options appear. This is where you can see information about your ad account, you can go to each ad account in either ads manager or power editor, you can view and edit payment methods, and you have the team management options of adding people, assigning roles, and viewing history. You can also deactivate ad accounts if you don’t want them any more.
The apps option will show you any apps you have created and claimed. You can see their IDs, manage teams members, and edit the apps directly as necessary.
The pixels option is, as you might have guessed, a way to access the various Facebook pixels you have created for your sites. It will show each pixel by name, with ownership, activity status, last time data was received for it, and the team management features.
The product catalogs option is similarly self-explanatory. Whenever you use product catalogs for Facebook ads, the catalogs can be added to this section and managed here.
Assigning People and Adding Partners
On each of the above sections, you see “add people” and “assign partner” in the subsection for each asset. What’s the difference?
Adding people is a way to give an individual access to specific business assets. For example, if you manage page information but someone else in your team manages ads, you would want to add that person under “add people” to the ad account assets. They don’t need to see everything; you can limit them to specific ad accounts, and they don’t have to see apps, pixels, or any of the other assets if you won’t want to add them.
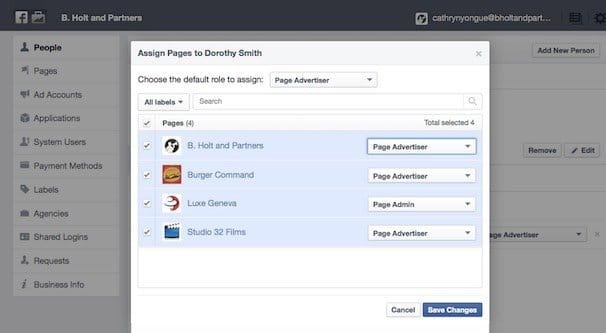
When you add a person, you can choose to add them either as an admin or as an employee. Admins have full access to view the business manager settings, change them, manage employees, and everything else. Employees only have access to see business manager settings but not change them, and they can’t manage other employees or manage assets. They can be assigned to specific assets, and from there are assigned a page role. Also, when you add a person, you are given a checklist of your assets and can check which ones you want to add them to, so you don’t have to go through the process for each asset individually.
Adding partners is similar, except a partner is another business page rather than a personal account. For example, if you outsource your ad account management to another company rather than a team member, this is where you would add them as a manager for your ad accounts and other assets. Again, you can give them as much or as little access as you like. When a business manager requests access to an asset, this is where they appear.
When you add a partner, you need their business manager ID. You need to get this directly from them, you can’t find it elsewhere. You can add them as one of the page roles linked above to whichever assets you want, the same way you manage people.
Managing Projects
One major organizational feature of business manager is the project system. You can create projects, which allow you to assign sets of assets – a page, its ad accounts, a related Instagram account, etc – to the project. This is a way to keep sets of assets organized, but it’s not required. If you don’t have dozens of assets to manage, it’s probably overkill to use a project. Projects come into their own when a company with dozens or hundreds of assets needs to keep them all organized and tracked in smaller sets.
Once you have all of your assets set up, your team added, and any partners assigned to their roles, you’re good to explore. Business manager has a ton of advanced features just waiting to be discovered. I’m simply not covering them because this is a beginner’s guide. Just poke around the menus, and if you have any specific questions, either ask in the comments or look around the business manager help center.