 Written by ContentPowered.com
Facebook is a highly visible platform used by billions of people every month. It’s also a massive collection of personal information of all kinds. While this doesn’t impact most people, some people find privacy issues to be primary concern. What can happen with public posting?
- Burglars who know their targets can use Facebook posts to see when residents are out of the home, to use that opportunity to break in.
- Employers can see behavior that reflects poorly on their company and fire you.
- Employers can see employees express opinions they don’t agree with and fire you.
- Abusive people can stalk your profile, which can lead to anything from online harassment to assault.
There are any number of reasons why you might want to restrict who can see the posts you make, either sharing only to certain people, or restricting certain people.
Now, since my usual audience is thinking about Facebook from a business perspective, I do have to say that there are far fewer ways to restrict visibility of Facebook posts for businesses than there are for personal profiles. Businesses aren’t allowed to discriminate; they make public posts, or they make targeted ads. There’s not much leeway in between. Everyone else, using personal profiles, has a few more options. I’m going to dig into both types of profile and show you five different ways, depending on your situation, that you can pick and choose who can see your posts.
1. Block People
The first option you have is simply to block people who you don’t want to see your posts. This is, however, only part of a comprehensive solution.
Blocking someone prevents that person from seeing posts you make, as well as comments you leave on other posts. They can’t see your posts, and you can’t see theirs, regardless of how the post is shared to them. Even if they are given a direct link, it will simply appear as though the link is broken.
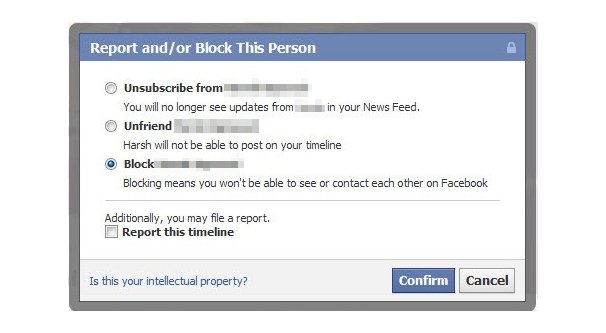
However, if that user logs out or creates a secondary Facebook profile, they will be able to see the post. Therefore, you need to set your privacy settings to hide anything from non-friends. This is a profile-only feature, you can’t do it as a Page, that option was killed off nearly a decade ago.
Skip to option 2 to set up profile privacy. As for blocking people, you need to go to the profile of the person you want to block. They will have an options drop-down below their cover photo, which you can use to block them. If they’ve been harassing you or are otherwise worth reporting to Facebook, do that first. It might get them banned.
You can also go to the settings menu for blocking, found here, and type in the name of a user to block. You will still have to make sure you’ve found the right user, but it’s easier than going to their profile directly if they have something offensive on their cover photo or what have you.
2. Adjust Post Sharing Settings
You are able to control who can see a post you make when you make it. When you click to make a new post – in the “what’s on your mind” box at the top of your feed – you can write your post, and there’s a drop-down for where you’re publishing the post. The News Feed is typically default, but you might have Your Story checked instead or in addition. Keep in mind that they both have different privacy settings, though Stories are by default set to friends only.
The options for your post include Public, Friends, Friends Except, Specific Friends, Only Me, Custom, and organizational groups that Facebook uses in the background. These are not actual Facebook Groups – for posts to be visible to people in your groups, you need to make the post in the group, or have your post visible to the public, or be friends with the person involved.
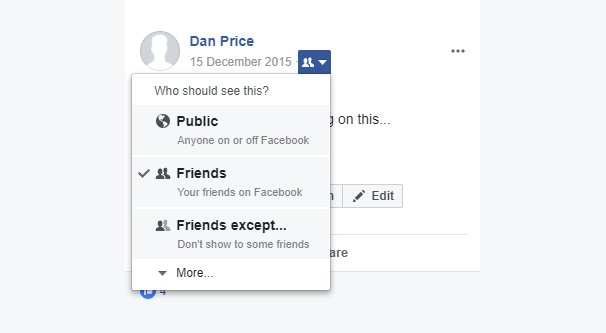
This is potentially more useful than the third option below, because it allows you to control your posts on a post-by-post basis. For example, maybe you maintain a public façade of a professional, but you like to party on the weekends and on spring break. You can set your party posts to be visible only to a specific, pre-approved list of your friends, so post content and images don’t leak out and jeopardize your job.
I still recommend setting at least a basic level of profile-wide privacy. Facebook already sells your personal information, you don’t need to make it free to scrapers as well. Any time your profile is visible to the public in its entirety is a time you’re opening yourself up to all manner of risk, from phishing to doxxing and beyond.
3. Take Your Profile Private
The best way for public profiles to control who can see the posts they make is to adjust profile-side privacy settings.
In order to set up this situation, first you need to go to your Facebook settings. The drop-down in the upper right brings you to an options menu, so click settings there. On the left, you will see Privacy.
Under “Your Activity” you should see “who can see your future posts?” Set this to one of the options other than Public. “Friends” allows anyone who you add as a friend to see your posts. “Friends except” allows you to build a specific list of people who can’t see your posts. “Specific friends” allows you to build the reverse, a list of specific people who CAN see your posts. “Only me” shows your posts to no one except you, which is a little odd.
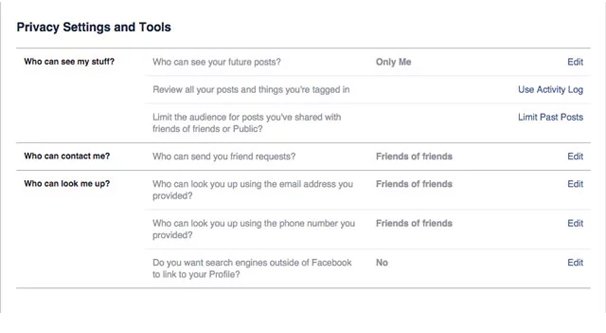
You can also click “see all” to see a list of your “Groups” that aren’t groups. For example, when you add an employer, other people who have that employer are added to a soft group. You can choose that kind of group. You can also choose one based on your education or location, or just family-only. There’s also a custom option that allows you to specify how your posts behave for each person individually.
The simplest way to handle this is friends-only, with custom settings if you don’t want to interact with specific friends. Also, note that this is only for posts moving forward; old posts still behave by whatever their old visibility settings are. To hide those, you need to click the next setting, “Limit the audience for old posts on your timeline.” You can click this button and it will automatically make every past post you’ve made friends-only.
4. Use an Unpublished Post
Now let’s talk a little bit about Pages. Pages can be created for organizations, communities, individuals, or brands, and they have different rules. On the one side, they have a lot of benefits on Facebook, like the ability to run ads, to accumulate followers, and access analytics. On the other hand, they have no way to restrict the privacy of their account besides “on” or “off”. You can unpublish your page, but that means no one at all is able to see anything you post. When your page is public, every post you publish is visible to everyone.
The exception to this is “unpublished” or “dark” posts. Dark posts are posts that you make but that are not published to your public feed. They are invisible to everyone who doesn’t have a direct link to them.
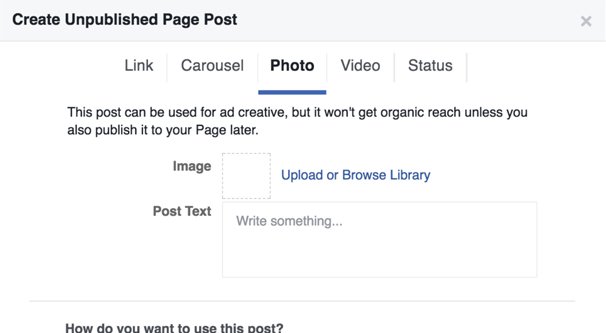
The most common way these posts are used is with advertising. You make a Facebook post but keep it unpublished, and you run an ad that sends people to that post. The best use for this is actually split testing. You can post the same thing five different times with different images, and no one can accuse you of spamming them, because they can’t see them without being the target of the ad or being given the link to the post.
The trick with using unpublished posts is that you can only create them using the Facebook power editor, which is a special add-on for Chrome that gives you a bunch of advanced features for Facebook Ads.
You can read all about how to obtain, set up, and configure power editor over here. It’s not exactly a secret, but it’s a tool that most people don’t think to use right away, since it’s usually more focused on advanced marketers.
Of course, using an advanced tool aimed at marketers just to get some vague approximation of a privacy setting on a Facebook post is pretty inefficient.
5. Run a Highly Targeted Ad
Another option you have as a Facebook page is simply to run ads targeting the users you want to reach with your posts, excluding others.
With ads, you can target based on a variety of different, specific qualities and categories. You can target people based on their education level, their employment, their income, their demographics, their location, their interests, and on and on.
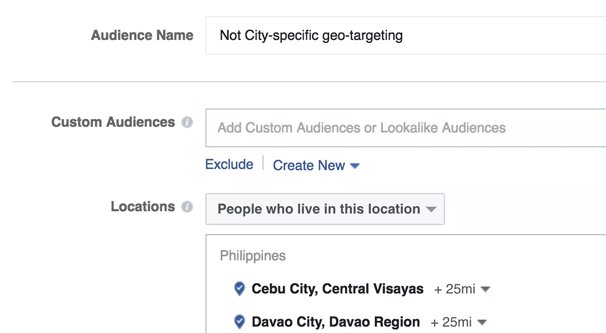
You can also upload a specific list of an audience, that you gathered from your website or put together from another source, and use that as your targeting list. This list can be pretty narrow, though Facebook doesn’t allow you to drill down to advertise only to one or a very small group of people, to prevent abuse.
The biggest downside to this option is, of course, the fact that it’s an ad. If it’s an ad, it means you have to be paying for it. That’s really not a good option for privacy control, and besides, even if a user isn’t part of the target audience, they can still see the ads in the right circumstances.
Bonus Option: Groups
Facebook groups are also a potential option that can be viable in a few rare circumstances. When you create a Facebook group, you can make the group private. You can make the group so private it doesn’t appear in Facebook search at all, or you can leave it open to appear in search but closed enough that people can’t see anything inside it unless they’re members. Usually you leave one publicly visible rules post with instructions on how to apply.
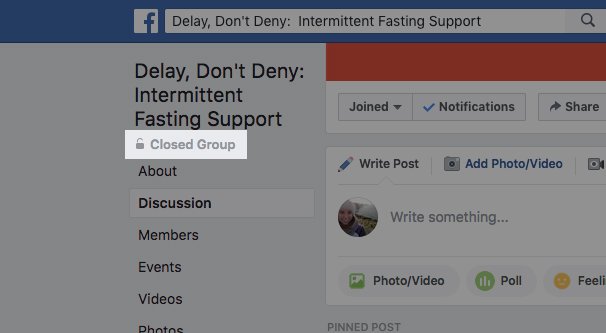
Normal users can use groups as a sort of small community of friends. Post to the group rather than to your timeline, and only the people in the group will be able to see the post. This has the added benefit of being more visible to people who are engaged with the group than posts on your news feed would be.
Pages can create groups centered around their community or around a specific topic, and can be very picky about who they allow into the group. I know a few brands that make closed groups for high-paying customers, or use it as an incentive for people willing to pay for consulting. Jon Loomer’s PHC is a similar sort of group. Usually, of course, it’s easier to run these groups in closed web forums or other locations rather than on Facebook, but that’s entirely up to you.
Whether or not this option works for you depends on why you want to limit the visibility of your posts. If you’re hiding from a stalker or you want to post your vacation photos away from the prying eyes of your parents, teachers, or employers, a group can be perfectly fine. If you want everything you post to be hidden from specific people, you’re probably better off blocking, unfriending, or excluding those specific people from your post visibility.
