 Written by ContentPowered.com
When you’re running Facebook ads, you have three options. The first option is to make them natively, using the options Facebook gives you. You can boost posts, you can make ads, you can dig for settings you use, and all that. It’s messy, it’s inefficient, and there are better ways. The second way is to use Facebook’s Power Editor, which provides a few new options and rearranges existing options to be better displayed and easier to use. It’s the general Best Option if you’re not willing to spend money on managing your ads, but it is not without drawbacks. For one thing, it only works in Chrome, so if you’re not using Chrome you’re out of luck.
The third option is to use a third party system, and that’s where AdEspresso comes in. AdEspresso is a tool designed for small and mid-sized businesses, with an eye towards managing Facebook ad campaigns in an easy and intuitive way. Even large businesses can use it, of course, but most of them just outsource to an agency.
AdEspresso co-opts the place of Power Editor or the native ads manager. Everything relating to your ads, from design to testing to analysis, is all done inside the app. You’ll get to know it very well if you choose to adopt it which, after this post, I suspect you probably will. In the mean time, if you’re interested in reading a history of the company, you can check out this interview.
Oh, and AdEspresso has a pretty great set of resources for marketers of all skill levels. We reference their blog fairly frequently, and their advanced guides are very helpful. That’s all free content, though. You don’t need to buy the product to access all the information they have on their blog.
Features of AdEspresso
AdEspresso essentially has four main features. These are ad creation, split testing, analysis, and optimization.
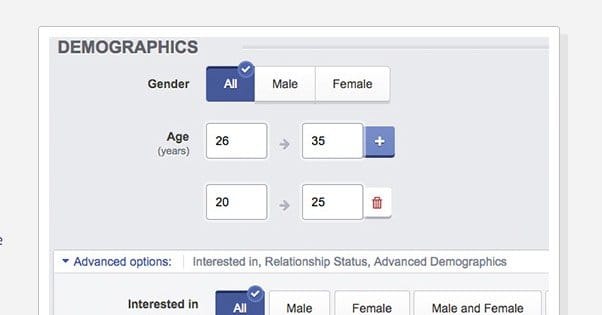
Ad creation is great. It has all of the features you would get out of the Power Editor and then some. It especially shines when you look into audience targeting. One of the coolest features of AdEspresso is the ability to target intersections between two audiences, which is difficult or impossible to do natively within Facebook. You don’t have those options available to you though the normal ad manager, and you need to finagle some workarounds if you want to mimic it through Power Editor.
Testing is where a lot of the benefits of AdEspresso really come into play. You can quickly, easily, and effortlessly create variations on any ad, in bulk or one at a time. What was a tedious process with Power Editor becomes the work of a few minutes in AdEspresso. They even allow you to create buyer personas and keep them on file, so you can segment your ads by persona before you segment them by other splits for testing.
When I say it’s easy to create variations, I really mean it. It’s a matter of a literal three clicks to create hundreds of variations, which you can vary manually or use their smart robot to design. Here’s an example:
- You make six different target audiences using the AdEspresso advanced targeting features.
- You make three ads for different campaigns.
- Each ad, you make three variations.
- With a handful of clicks, you can apply each ad variation to each audience for full fill of the table; three variations per ad, three ads, 6 audiences per variation, for a total of 54 ads created.
Imagine how long it would take to make 54 split-testing ads using whatever method you’re using now. I know for me that would be the work of half a day or more. Heck, it would eat up half the day just uploading the ad images over and over, but AdEspresso saves the image so you can just apply it to the ads whenever you want.
Take this one step further. AdEspresso allows dayparting, which is a hugely beneficial feature if you know when your target audience is likely to be browsing. If you notice that Thursdays are somehow excellent for your ads, but other days of the week you only seem to get conversions around 5pm, you can set up a custom schedule for when and what times your ads run. This is amazing for saving money, because it means you’re not wasting cash showing ads to people who click idly and don’t care.
The analysis side is ridiculously robust. I mean, AdEspresso keeps so much data they can publish posts like this just based on their examples gallery. It’s crazy how much data you can harvest, how easily you can compare it, and how well it blows Insights out of the water.
For one thing, it’s amazingly visual. They don’t try to limit themselves to the bland blue and gray color scheme Facebook uses with Insights, and honestly, that alone is almost enough to get me to buy the app. Too many brands sacrifice usability for branded style, while AdEspresso is here proving you can have both.
If you’ve used Google Analytics custom dashboards and reports, you’ll have some idea of some of the things you can do with AdEspresso analytics. For one thing, they make it easy to compare the performance of entire campaigns, as opposed to the performance of just ads within a campaign or performance you need to export to compare. They can also break down performance on an hourly basis throughout the week, which of course is very helpful when you want to get into dayparting.
In case that wasn’t enough, you also have the ability to add tags to your ads or campaigns so you can see aggregated statistics for tags as a whole. Maybe you have five different Christmas-themed campaigns running with different targeting and different options; that’s cool, tag them all as Christmas and you can see their performance overall. It’s incredibly useful.
On top of that – yes, it keeps going – they have all sorts of additional data about interest targeting and performance, and engagement analytics layered on top. They even have a simple numeric ranking for engagement scores, which can give you an at-a-glance idea of how well a particular ad is doing, even when the objective isn’t engagement. Plus you can export everything to a spreadsheet, because of course you can.
AdEspresso Pricing
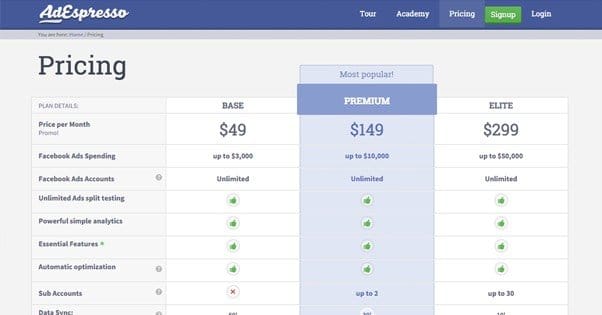
There are four tiers of pricing, and no, there’s no limited free version. You have the ability to claim a 14-day free trial, but that’s the limit of the free usage of the app. For the most part, the only difference between the plans is the ad spend it allows you to process. If you’re a large business with a huge amount of ad spend, you won’t be able to use the cheap plans.
- The Base plan costs $50 per month and allows up to $3,000 monthly in ad spend. It doesn’t allow sub accounts, and it syncs your data once per hour.
- The Premium plan costs $150 per month and ups the spend limit to $10,000. It allows two sub accounts, syncs your data twice as often and gives you an hour of dedicated training.
- The Elite plan costs $300 per month and ups the spend limit to $50,000, allows 30 sub accounts, syncs data every 10 minutes, and gives you four hours of training.
- The Enterprise plan costs $500 per month and is unlimited in everything.
All plans also come with the Facebook pixel integration, personalized optimization suggestions, data imports and exports, advanced options, Google Analytics integration, templates, and notifications.
Of these, the Premium plan is generally ideal unless you have a very low ad spend and don’t need a team to help manage your ads. Of course, which plan you go for will depend entirely on your ad spend, so it’s not up to the features list to decide for you.
Creating Campaigns
I’m going to walk you through creating a sample campaign. I’m assuming you’ve registered and are using the free trial for this. You’ll need to set up your account and link it to your Facebook account, so it can manage your ads. Once it’s all set up and you’re logged in, just click the big “new campaign” button at the top. You will have to plug in a name and a billing account here, and you can add tags if you want for later organization and comparison.
It will ask you what you want to promote. In this case, you can click the website tab and click news feed, which will create a promoted post. Once you click proceed, you’re taken to the ad design menu, where you can click which page you want to promote.
This is where things get interesting. You have one field for headlines, but you can add multiple headline variations for split testing. The same goes for ad text, you can vary it just by clicking the + to add another field. You can also upload as many images as you want to test. Keep in mind that this is creating a matrix of possibilities. If you have title A and title B, copy 1 and copy 2, and image X and image Z, you end up with the ads A1X, A1Z, A2X, A2Z, B1X, B1Z, B2X, and B2Z.
This wouldn’t normally be a problem, but remember that you do have to pay for all of those. The more variations you test, the more your budget has to be divided amongst all of the options. If you’re not keeping tight control on your ad spend, you can easily add a few too many variations and drastically over-spend. AdEspresso makes it so easy to make variations that you may not even realized consciously how many you’re making.
Continue filling out the data as normal; landing page, link description, display link, CTA, placement, and all the rest. This is all very standard. You can also choose to track your goals in Google Analytics and with the Facebook Pixel, if you have the pixel implemented on your site.

After this, you get to fill out audience targeting data. There’s actually not a lot of difference here between AdEspresso and Power Editor. Seems as though Facebook did something right with that plugin, eh? Still, it might be worth taking a look into the documentation to see if any features stand out to you.
Normally, this would be the end. However, AdEspresso adds in one more question, which is “what do you want to test?” This has a bunch of different options you can test, like difference between gender performance, or relationship statuses, or placements, or whatever else you have chosen in your targeting. Some options will be disabled, though. Remember, your ad creative variance plus your targeting variance can add an incredible number of variations. AdEspresso caps you at 250 to make sure you don’t go overboard and end up with meaningless data from tiny sub-audiences.
The budget and bidding menu is next, and it’s all very self-explanatory. Frankly, if you’re not aware enough of Facebook ad bidding structures to comprehend this section without my assistance, you’re probably not in the right mindset to be using as robust a tool as AdEspresso. You’re more or less just using a jackhammer to dig up a flower with overkill.
Once you have that set, you can publish your ad variations. That’s it! No going back and copying campaigns and making variations manually; AdEspresso does it all automatically. As soon as you click publish, everything is up and ready to go, according to whatever timing or budget constraints you may have added.
The Down Side
So what possible downsides are there to using AdEspresso? Frankly, there isn’t much. I’ve already mentioned how easy it is to go out of control with different split tests, so that’s something to watch out for. It’s far too easy to just go off the rails and end up with too many tests. Keep in mind the general advice that you avoid testing more than one variable at once. The way AdEspresso handles variable matrices is helpful, but you can still take things out of hand if you try to test too much.
The other problem is that, as a beginner’s tool, it’s overkill. Paying $50 per month for a tool when you might not even be making that much profit out of Facebook ads is difficult. If your weekly spending with Facebook ads is under $100, you might not need such an advanced tool. You really need the budget to support so much testing.
The analytics are great, but it’s a lot to take in all at once. If you’re not familiar with how different detailed analytics suites work, you might be overwhelmed or not know quite what data you want to follow. Thankfully, AdEspresso itself has a pretty robust knowledge engine that offers personalized suggestions to further optimize your spending.
The biggest gripe I have with it, though, is that it only works with Facebook ads. I would love it if AdEspresso made a version that worked with AdSense or some third party ad providers. Talk about amazing.
What do you think of AdEspresso? Let us know in the comments below!

Kevin FactSumo
says:Thanks, Thinking about signing up. I’m new and starting out so I wasn’t sure if the $49 bucks was worth it. I’m still not sure, but I think I’ll boost my money per week.
Hey Kevin, I just saw this review of us now, we actually have a University Plan for $19/month. https://university.adespresso.com Will let you use the tool if your ad spend budget is 500 USD per month and under!
My experience with Adespresso is that it optimizes too quickly based on judgements that aren’t necessarily truth. I can optimize just based on cost per click better than AdEspresso, and it doesn’t cost $50/month. We spent $100’s on adespresso and asked for help, but never were able to make it worth our costs. Would not recommend.
Bruce M.
says:before you spend a dime, you need to make sure you have customer service. i didn’t get any. it was dismal. it too them two weeks to resolve a simple customer service issue. i won’t spend a dime with these guys, they wasted so much of my time and then basically fobbed me off with a duff reply, which they could have given me two weeks earlier.
Alex
says:BUYERS BEWARE! If you find yourself on an up-sell LP to convert your monthly membership to an annual… … and, If that landing page says “if you ever decide the platform’s not right for you we’ll refund you for remaining months you won’t use”… In my experience, this is not true… My business is moving away from needing this software & when I contacted support to take advantage of that landing page’s promise, I was given a polite and consistent NO.