Written by ContentPowered.com
Facebook, juggernaut of social media that it is, has a lot of purchasing power. When they buy something, you expect it to be integrated with the platform as a whole, sooner or later. Surprisingly enough, this hasn’t really happened with one of their major purchases back in 2012; Instagram. Rather than roll the Instagram functionality into Facebook, the sites have remained separate.
Add to this a second happening; in late 2014, marketers began to dig into Instagram in earnest. This was primarily fueled by a Forrester survey that proclaimed the engagement rates on Instagram posts were orders of magnitude higher than those on any other social site. One Instagram post would get more engagement than a month’s worth of Facebook posts combined.
This has led to marketers wanting to use both platforms, only to be stymied by the restrictions of each.
See, Instagram was designed to be a mobile app, with a desktop site only for browsing and engagement convenience. If you’ve tried to get into Instagram, you’ll find it impossible without a smartphone or tablet device. There’s no first-party way to post from desktop, and for a long time, they refused to even provide an API for developers to use. The only workaround was to use a third party service, which was really just someone on the other end of the line using their own smartphone to push your updates.
Facebook has an ever-growing percentage of users browsing via mobile, making Instagram integration all the more beneficial. Before, when 20-30% of Facebook users used mobile, tying in a mobile-only platform would be nonsensical. Now, with close to 60% or more of Facebook users using mobile devices, it makes a lot more sense.
Businesses that want to take advantage of Instagram and Facebook simultaneously will be able to link the two profiles, and can then move on to boosting integration.
Step 1: Link Profiles
The steps for linking an Instagram profile to a Facebook page are simple, but they vary from device to device. Obviously, you need both a Facebook page account and an Instagram account.
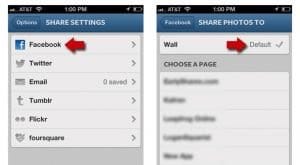
On iOS devices, you need to log into Instagram. Go to your profile and tap the gear icon for preferences and settings. Tap the share settings button, and the Facebook option when it appears. You will be asked to add your Facebook info, which will give the site permission to link the two accounts.
On Android devices, log into Instagram and go to your profile. Tap the vertical dots for settings and tap Linked Accounts. Under this menu, tap the Facebook option and give Facebook your info to log in. This allows Facebook to use the Instagram integration for the two accounts.
On Windows phones, if you’re in the unenviable position of having to use one, log into Instagram. Find the … icon and tap settings. You will have to swipe down until you find preferences, and within that, find Share Settings. Once again, tap the Facebook option and put in your login information. This links the two accounts.
Once both accounts are linked, when you post a picture on Instagram, you will have the option of posting it on Facebook as well. This occurs on the “add a caption” screen when uploading a photo.
Step 2: Laying the Groundwork
In order to make your linked profiles a conjoined success, you need a strong foundation. Both your Facebook and Instagram profiles should be complete, robust and branded. This means similar logos or profile pictures, similar information, and so forth.
You should also know how to best make use of Instagram as a platform. Hint: it’s not doing everything via mobile. Okay, so everyone loves the filters, and they can make a boring camera phone picture look a hell of a lot better, but it’s still a camera phone. It’s still Instagram. It’s all limited.
Instead, what you should do is involve your PC or laptop workstation. Take pictures you want to use, either with a camera or your phone camera. Send those pictures to your computer. Edit the heck out of them. The focus of the image, the subject, the quality, the impact; it all relies on having a high quality, beautiful image. If it’s blurry, if it’s noisy, if it’s obscured by a lens flare, it’s going to hurt you. God forbid it looks like something that game out of Blingee or Photobucket’s recently posted list.
Once you have your compelling image, transfer it back to your phone. You can, if you wish, use one of those previously mentioned third party apps on your desktop. One good alternative, actually, is to use the BlueStacks smartphone emulator with Instagram installed. In either case, you’re pushing the picture on a phone or on an emulated phone environment.
Once the image is on the phone or phone-like device, load it up for posting through Instagram. Customize your filters, your captions, your tags and your description. Push it through to Instagram and share it on Facebook.
- A note about Facebook and hashtags. Hashtags are excellent… on Twitter and Instagram. On Facebook, they have been proven time and again to decrease engagement. Users on Facebook utterly hate hashtags, and you should plan accordingly. This means, if you’re pushing a picture from Instagram to Facebook, prune out the hashtags. You can go on your Page and edit the description later, if you wish.
Step 3: Succeed
There’s not a lot more that goes into having a high-impact Instagram presence. You can do a few minor things, but most of what constitutes success comes from posting great images with good captions.
- Avoid any and all promotion. Instagram just isn’t the place for it. Draw attention to yourself and your products with compelling images, not with sales speech.
- Post weekly, at minimum. Posting a couple times every day is ideal. You don’t necessarily need to post every single day, but you should have a commanding presence.
- Encourage sharing of your Instagram posts through your other social channels, Facebook included.