 Written by ContentPowered.com
The recent outstanding success of the ALS ice bucket challenge has brought one thing into focus for many nonprofits; Facebook can be a big deal. Many businesses, and most nonprofits, struggle with getting Facebook to work for them. It’s free to register, it’s free to use, but it virtually requires paid ads these days. This can be a deal breaker for many nonprofits, operating on tight budgets as they are.
How can you take a nonprofit and build a Facebook page out of it, from scratch, and still find success amidst the competition and the relatively little attention people pay to anything these days?
Make Sure Your Organization is Well-Defined
If you’re an established nonprofit, chances are you have a defined mission statement, a good relationship with your cause, and an audience already following you on your website or through a newsletter. If by chance you’re a relatively new nonprofit, you’re going to want to take some time defining all of that.
What is the story behind your organization?
What audience are you trying to reach?
What is your goal with using social media?
This information will guide you through the rest of this process.
Create a Nonprofit Page Specifically
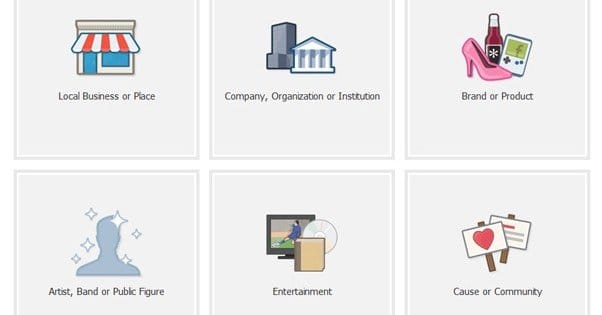
When you go to create a new Facebook page, you’ll be prompted to choose the type of page you want to make. Facebook has six options to choose; local business or place, company/organization/institution, brand or product, artists/band/public figure, entertainment, or cause/community.
While it’s tempting to go for cause/community from this list, that’s not the correct option. You will want to pick the “company/organization/institution” option. This is because during the next step, you will be asked to choose which type of company, organization, or institution you are. Nonprofit organization is one of the choices here, and gives you a page specifically set up for an organization. If you choose cause/community, you’re creating a much more informal page without the benefits of a specific page type.
Fill Out Profile Information
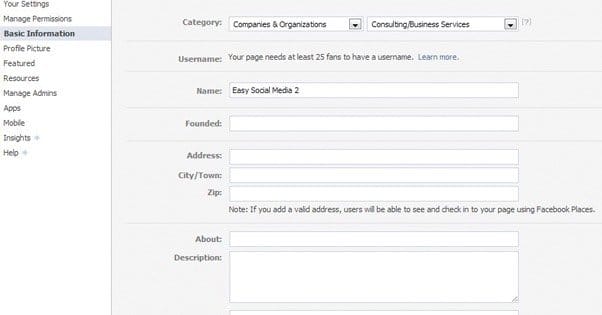
Once you’ve created your page, Facebook will take you through a basic wizard to fill out some information for your page. Once it’s done, there will be other sections to fill out as well, so here’s the various sections you should fill out.
- About – This section should include a brief description of your organization and your cause. You’ll have the chance to put in the link to a website as well, so I suggest adding a link to your primary site. Other social accounts go elsewhere. You will also be asked whether your organization is a real organization or not; this means is it registered as a nonprofit or is it just an informal organization. Answer accordingly.
- Profile Picture – Your profile picture is often just a picture of your logo, but you can change it at will. A logo is a good place to start, until you know what your fans like and what you can use as a display picture.
- Cover Photo – You won’t be able to choose a cover photo until after the wizard is complete, but you will want to create one quickly. A cover photo is like a cross between a billboard and a banner image. It’s huge and it’s the first thing users see when they visit your page. Make sure it’s high-res and compelling, ideally having something to do with your cause.
- Custom URL – Facebook gives you the opportunity to choose a custom URL for your page, so people can visit www.facebook.com/yourorganizationname rather than www.facebook.com/1193931992341, or whatever set of numbers they assign to your account.
- Add any additional mods and admins you want. No one person can run your entire Facebook presence. Unless you have a dedicated social media specialist, that is. You probably don’t; that kind of thing is beyond most nonprofits. Even so, having more than one moderator account or admin account to manage things while the primary is out sick is perfectly viable.
- Make sure posting ability is turned on. This is a set of options in your page settings. There will be “posting ability”, “tagging ability” and “replies” all in your settings menu. Make sure they are all checked to allow people to use them. This gives your users the maximum amount of ability to share your posts, comment on your wall, and tag friends. Leave these on unless you find them being abused by unscrupulous people, in which case either disable them or block those users.
- Add Milestones. Milestones are significant events in the history of your organization that get banners and descriptions in your news feed. More importantly, they show up in the timeline on the right of your page, so users can explore your history. If your organization has milestones – which can be anything from foundation date to financial goals and audience numbers reached or expansions to new locations – you should add them. This gives new users something to explore other than the posts you make.
Start Initial Growth
Once you have your page set up, you will have to publish it. This is easy; just go to your page and look for the banner up to. If your page isn’t published, you’ll see a big prompt for publishing it to make it visible to everyone. Sometimes, Facebook publishes it when you’re done with the initial setup wizard. This is fine, so long as you’re doing all of your setup in one sitting. If you’re planning a multiple-session setup, you’ll want to keep it unpublished until you’re ready to have users find it.
- Like your page with your personal profile. It’s a simple way to get your first follower, and it allows anyone looking at your personal profile to see that you’re associated with the page, as long as the page is published and you haven’t hidden your association within your privacy settings.
- Invite friends to like your page. When you create a page, you need to do it with a personal profile. There are many reasons for this, but one of them is to give you access to an immediate audience. You can click a single button to send out a wave of invites to everyone on your friends list. This should give you an immediate boost of followers, depending on how many of your friends are willing to follow a page you recommend.
- Import your mailing list to invite via Facebook. Chances are, while you’ve been running a website, you’ve set up an email newsletter. You can export your mailing list as a CSV file through whatever email management program you use. Take that file and upload it to Facebook, and the site will automatically cross-reference the email addresses on it with addresses that have Facebook accounts. It will then send invites to anyone on that list.
- Post a status update. You should have at least one message ready to greet anyone coming to your page. It doesn’t have to be complex; a simple welcome greeting will do. You can also create posts to link to your website and any other important pages, in case anyone coming in wants to look through your minimal message history.
- Connect with any partners and organizations you interact with regularly. Many nonprofit organizations have business relationships with sponsors, donors or other nonprofits for mutual benefit. Look up any of those other organizations on Facebook and add them as “friends” through your page. This will give you some more networking and audience-building opportunities.
- Join Facebook groups for non-profit promotion and sharing. Facebook groups aren’t as potent as some other aspects of Facebook, but they’re generally beneficial when you join the right ones. Look for groups that help promote and organize nonprofits, specifically, and any groups that relate to your cause. Join them if they’re active, and use them to promote your page in a socially interactive way.
- Link other social network accounts you run. If you have other organizations, other pages, or accounts on Twitter, LinkedIn, Google+, Pinterest, Instagram or anywhere else, you can add links to those profiles in a supplemental about section. This gives more exposure to each of them, as users follow your Facebook and check to see if there’s any other sites they should know about.
Set a Content Schedule
Nonprofits are typically pressed for time, money and resources. This means you generally don’t have the time to manage a Facebook page on your own, the money to hire someone to do it all for you, or the resources to dedicate to doing it either way. This makes it very tough to run a successful page, but there are free tools you can use to help make it significantly easier.
- Try to post several times a week, or daily, if possible. When you’re first starting out, it’s important to get as much active exposure as possible, so people will share your page and you’ll reach more people. If you only post once a week, people will like your page and then forget about you, and they won’t much care about posts they happen to see later. Capture their attention early and often.
- Make sure to use images with your posts whenever possible. Facebook is a very graphical site, and the people on it are very attracted to good images. It will take a lot of trial and error to figure out what posts are most attractive to your audience, but you’ll figure it out so long as you pay attention to what you’re posting and how it performs. Looking into Facebook Insights is the key to this growth.
- Links and images are good; plain text posts are bland. This is really just reinforcing the previous bullet point; use graphical content whenever possible. You can use images and videos, you can use preview images with links, just avoid using plan text posts whenever possible. Users tend to glaze right over posts without graphics of some kind, and no, emojis don’t count.
- Engage with your followers and respond to comments. Facebook has a complex algorithm that determines who sees your posts and how often, and unfortunately, posts from a page always take second fiddle to posts from profiles. This means you need to do everything you can to engage your users, which typically involves asking them questions and discussing their answers frequently.
How Facebook Determines Post Visibility
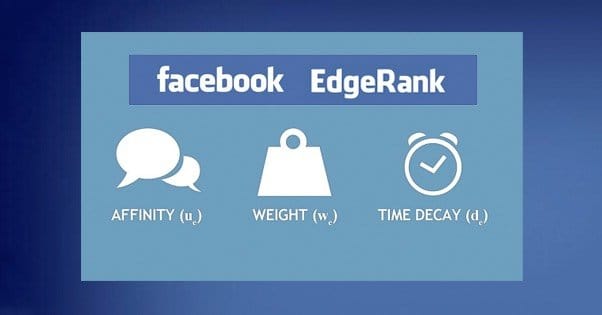
That complex algorithm I mentioned is called EdgeRank, though the old EdgeRank is a deprecated term and the new algorithm is like a much more advanced and subtle version. People keep the name simply because it’s easy to remember.
EdgeRank has a few factors going into its calculation, and it’s an individual calculation between you and each user separately. You don’t have an EdgeRank score; it’s a dynamic shifting rank with everyone.
EdgeRank is composed of three basic components:
- Affinity. This is the ranking of relationship between you and the user in question. The more that user has commented, liked, shared, and interacted with your page in the past, the higher their affinity. The less they have interacted with you, the lower their affinity. More affinity is good, hence the requirement that you post frequently and keep conversations going; it’s all more opportunities for a higher affinity.
- Weight. This is a fixed factor for a given type of post. Text posts have low weight, while images and videos have high weight. Links are somewhere in the middle.
- Time. This is a decaying factor that starts out high when you make a new post, and lowers as time passes. This is why old posts are less visible than new posts. It is slightly refreshed when users comment on your posts, giving them a bit more life before they decay out of view.
Affinity is the only metric you can control with any variability, which is why it’s the most important of the three to focus on.
Consider Basic Paid Promotion
Yes, I know that most nonprofits are strapped for cash and are always trying to raise funds. The purpose of Facebook ads, though is to help you grow faster and get more donations, which helps you have more resources to spend on other parts of your awareness campaigns. Thankfully, Facebook allows you to spend as little as you want on your marketing, which can be as low as a dollar or two per day. You just need to make the most of it.
I suggest reading up on Facebook PPC marketing. This guide, from WordStream, is very good. It’s aimed at businesses rather than at nonprofits, but it gives you a good idea of how to set up ads, how to target a specific audience, how to minimize costs, and how to track value. If you treat your nonprofit as a business and focus on getting the most out of every penny you spend, you can have a very significant return on your investment through Facebook.
Consider Creating Tab Apps
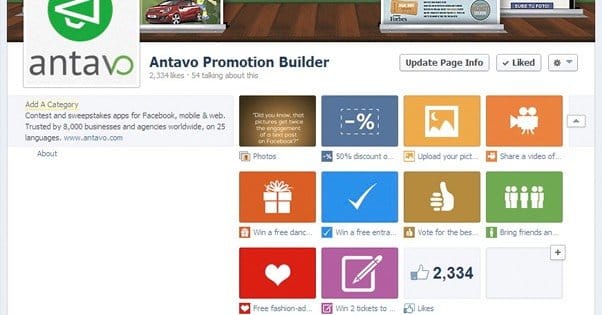
Tab apps on Facebook are like micro-websites that exist only in an iframe with the Facebook trappings around it. This allows you to direct users to specific information and functionality without actually directing them outside of Facebook. Plus, tab apps appear in the top bar underneath your cover photo, which allows you to create a cover photo pointing at them for more exposure. They also have graphical icons in the left sidebar on your page.
There are a number of free and paid services to create tab apps, but before you create one, you’ll want to have a goal in mind. Here are some ideas you can use to make tab apps that can benefit your nonprofit:
- A store for merchandise where profits go to your cause. You can often use a site like Society6 or Cafepress to set up a print-on-demand style merchandise flow. You submit a design, they handle the production and shipping, at the price of taking a cut of the cost of the item. Once you’ve reached a point where you can make the items yourself, you can cut out the middleman and bring in more resources for your cause.
- An app with a donation page for your cause. This one is simple; you probably have such a donation page on your website already. By putting one in a tab app, you make it easy for Facebook users to donate on a whim, rather than having to go out to your website and interrupting whatever they were doing.
- A contest app for various prizes, from merch to event tickets. Any time you have anything to give away, a contest is a great way to get more exposure, more engagement, and possibly an ice-bucket-style viral sensation all at once.
- An interactive app with information about your cause and how to support it. Informational apps within Facebook can be a great idea, and give you a lot more space to duplicate the functionality of your website without driving users away getting to it.
There are other ways to support a nonprofit through apps, but they rely on your own creativity.



I had a friend that I “thought” knew about setting up a Facebook page for our church. There are so many with the same name and we finally found one we could use that would identify us. So, he started with my info which makes the page info seem like a person (with a birthdate…ugh…mine) and I really need to change settings or take down the page and start over. I am technologically challenged at some of this. I had no idea so much was involved. I don’t guess he did either. For now, I need to know how to post. I mean I can post but I want to add events, etc. but not that it looks like it is from me. Am I making sense? Thanks!
I have a Community Outreach Page on Facebook – Pay It Forward 2K15. I would like to assign the non-profit designation to this previously created page but do not see how it can be done. I understand the non-profit designation can be assigned to newly created pages; however, I am not looking to create a new page for my Ministry. Instead, I would like to add the 501c3 designation to my existing page. Please help! Thanks! MNeal
I’m trying to figure out the best approach to being listed as a non-profit charity in advance of the GivingTuesday coming up. We have non-profit status through our parent organization but our existing organization page isn’t listed as a charity yet. It seems like the only way to do that is to upload certain documents and information that actually belong to our parent organization which is already listed as a charity. If we uploaded similar information for our organization would it even allow us to do that? Is it possible to change how a page is defined to allow for the non-profit type of organization? Is there a way for our organization to be defined as a charity and/or to receive donations this coming Tuesday? I’m not sure if making any changes to our existing page woud be the right thing to do here. Thanks.