 Written by ContentPowered.com
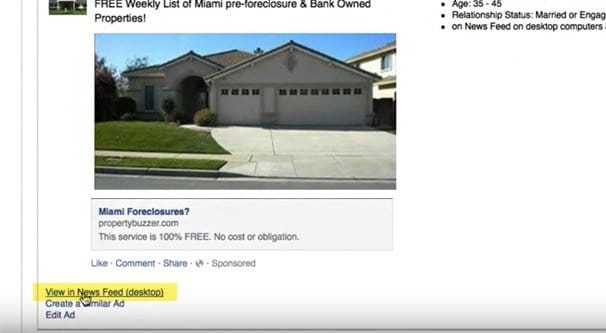
Facebook ads are very robust, and part of that comes from the variety of different formats and positions they can take. Sidebar ads are great for views and awareness, mobile ads can be excellent for app installs, and news feed ads are the best of all.
The trouble is, news feed ads aren’t like posts on your news feed, organically. Organic posts are easy to see what they’ll look like. Text is just text, of course. Images load and preview just fine. When you paste in a link, Facebook goes out and fetches the meta data it needs from the site – either the standard data from the site or the open graph data they specify – and generates a preview. You can see exactly what your post is going to look like before you make it.
Why, then, does it not do the same thing for ads? That’s the trick, isn’t it? Ads are much more important than organic posts, so the don’t fetch meta data to generate a preview. You have to specify everything, from the title text to the image.
There is a way to preview it; of course, it just doesn’t generate itself automatically the way you might think.
Previewing a News Feed Ad in Facebook’s Ad Manager
When you go through to create your ad, you are able to select the placement you want for it. News feed ads are great, as I mentioned, and mobile news feed ads exist as an entirely different option if you want to target – or exclude – mobile users. Given the sheer number of mobile users on Facebook, I highly recommend you take the time to make mobile ads.
The first thing you need to do is actually create your ad. You do this in the ads manager, or with the power editor, which I’ll cover later. Make sure to put in the details you want; link, image, title text, preview text, and any other details. You don’t necessarily need your audience targeting in place for a preview, but it helps so you don’t accidentally create an ad with default targeting.
Next, you will need to scroll down to the text and links section. There’s a sub-section here labeled “ad preview and placements.” This is where you choose the ad placement or placements you want, such as the news feed, the sidebar, search results sidebar, or mobile. By default, the main three will be selected; if you want to focus on only one, you can remove them from the selection. As long as they are selected, you will see a preview of what your ad will look like in that section.
If your ad is missing something, like a title or an image, you will need to go back and add them in the appropriate places in the ads manager. This will re-generate the preview so you can see what the new version looks like. You are free to make as many edits as you want before you create the ad, though you should be aware that you still have to pass Facebook’s screening before an ad can go live. Any ad, when you submit it for use, has to pass Facebook’s bot screening. If the bots flag something, generally a human will check it out and determine if the bot is correct, and will either approve or deny the ad with changes needed.
Occasionally, your ads will show an additional unusual placement, labeled the Audience Network placement. The Audience Network is Facebook’s network of enabled third party apps. If you create an ad that displays in the Audience Network, it will show up as an ad in these apps. It’s the only form of advertising available through Facebook currently that displays your ads on non-Facebook properties. It is, of course, limited solely to mobile ads.
For the actual mechanics of previewing an ad, follow these steps.
- Go to your ads manager.
- Click on “all campaigns” and “all ads” to see a display of all of your ads, both those that have been created and are running, and those that are still in draft form.
- Click on the name of the specific ad you would like to preview in the positions you have it set.
- View the preview. It should display automatically, but if it doesn’t, you can click the eye icon to see it.
- At the top of the preview window will be a list of different ad placements that apply to the ad. Click the one you want to see to change the preview view.
Once you are certain your ad is displaying the way you want it to, you can submit it to be approved for running, or you can put it on hold as a saved draft until later. I generally recommend sending it in early, so you can hold it as approved and have it start on a later date.
Previewing Ads with Facebook’s Power Editor
If you’re not familiar with Power Editor, and yet you create ads often enough to care about previewing them, you should probably look it up. The Power Editor is a Chrome plugin that allows you to create and manage ads in a much more robust fashion. Most notably, it gives you access to functions and features that are otherwise still in beta or being tested out. Many features we now take for granted got their start as tests in Power Editor. Plus, it’s free to download and use.
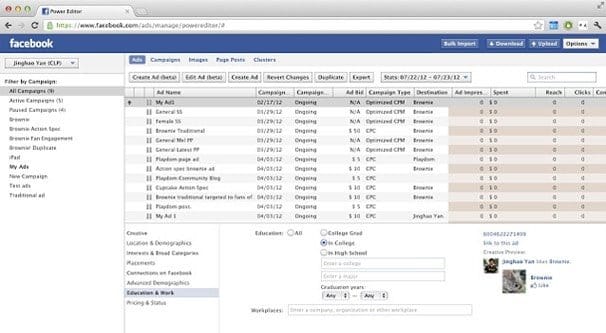
Now, you can preview ads you’ve created through Power Editor even if you didn’t make those ads with Power Editor in the first place. Alternatively, you can create the ads with Power Editor and preview them later.
- Navigate to the Power Editor menu.
- Click on the settings/menu icon on the site, the one that looks like a gear over top three lines.
- Click on the ad columns tab at the top. This will show you a list of settings you can view. Make sure “preview link” is checked.
- Close the settings menu by saving the change you made, if you made one.
- Click the “selected ads” option and scroll to the right in the resulting table.
- Each ad in the table will have a preview link, labeled Preview Ad. When you click this link, a preview of your ad will appear. You can do this for as many ads as you want to see.
If you do both of these methods – the ads manager and the Power Editor methods, that is – you’ll see that there’s actually a huge difference in the way they display. Not the ads themselves, they will display accurately in both, but in the way the system displays the previews.
One thing you might notice is that Power Editor is way more efficient and robust for handling multiple ads. It’s annoying to go through and try to edit multiple ads in the ads manager, but the Power Editor handles them brilliantly. This is one of the many reasons Power Editor is a great tool for pretty much any marketer to put to use.
An alternate method for previewing ads in Power Editor involves a different set of steps.
- Navigate to the Power Editor.
- Click the “manage ads” tab at the top of the page.
- Click the ad button in the tree structure, it looks like a box with a number next to it.
- Click the check box next to the ad you want to preview from within that set.
- Click the edit button to “edit” the ad, though you don’t need to make any changes.
- Find the “preview” section inside the edit menu. This will show you the different ad placements you can choose for that ad.
- Choose the placement you want to preview and you will be shown a preview of what the ad looks like in that placement.
These are your best options for generating a preview of a news feed ad in Power Editor. The steps are the same for other types of ads as well.
Generating and Previewing Instagram Ads
Instagram is owned by Facebook, if you didn’t know, and Facebook has been slowly rolling out additional integrations between the two networks. Integration of the ads system is one of the more recent innovations. You can now, using either the ads manager or the Power Editor, create Instagram ads. You need a Facebook page to use this method, however.

To create an Instagram ad within the Power Editor, you need to click the manage ads section at the top of the page, just like you would with Facebook ads.
- Click the ad set button, which looks like four boxes with a number next to them.
- Click the “create ad set” button, which will allow you to create a new set of ads within your chosen campaign.
- On the create ad set page, you will need to choose the campaign you want to use for Instagram. This will be a limited selection of your existing campaigns. Only campaigns that use an objective supported by Instagram will be available here.
- Name your ad set and click to create it.
- Select the new ads set you just created and click edit to create individual ads within that set. This will allow you to set your budget, your audience, your schedule, and your ad data itself.
- Choose Instagram under the placements menu, so that your new ad set is able to run on Instagram.
- Click to review changes, then follow the usual steps to create an ad.
Now, there’s more to running ads than just previewing them to make sure they look nice. You also have to make them compelling, choose objectives that work for their placement, and track your results.
Tips for Ad Success
We’ve written tips about ad success before, so I’m not going to go into great detail here. This should be just enough to get you started.
First, make sure your ad objective is the right one for the job. If you want clicks to your website, use a website click or conversion objective. If you want views, use a post engagement or page like objective. If you want app installs, use the app installs objective, and make sure you limit it to just mobile/Instagram ads so you’re not targeting people who can’t possibly take action.
Second, don’t be afraid to make a bunch of different ad variations. Ad variations with similar parameters are great for testing one change at a time. Want to see if a different image works any better? Want to see if your targeting is up to par? These are the kinds of changes you can make to improve your ads incrementally.
Additionally, don’t be afraid to make separate ad variations for different devices, different placements, and different content. Even if you’re running essentially the same ad on both desktop and mobile, it gives you more flexibility and more granular information if you create two ads within the same ad set instead of just one ad that displays on both.
Make sure you add the Facebook conversion pixel to your order confirmation page as well. Proper placement of the pixel is important. It’s invisible code – hence the name – but it has to exist and load for tracking to happen. If you place the conversion pixel on a page people who don’t convert can reach, you’ll have invalid data. The same goes if you put it on a page people don’t reach because they don’t go that far in the post-conversion process. Generally, the “thanks for ordering, your confirmation email is on the way” page is ideal.
Don’t forget to test various custom audiences. You can import a mailing list and use that as a targeted audience. You can set up a remarketing pixel and harvest information for people who visit but aren’t following you on Facebook; you can target them directly. You can create custom audiences out of your converted users, your bounced users, your mobile users, and even lookalike audiences. The sky is the limit, so test, test, test!

