 Written by ContentPowered.com
Facebook messenger is one of the most widely used messenger apps in the world. As of April of last year, they were pulling in a shocking 1.2 billion monthly active users. I’m sure that number is even higher by now.
As it stands, there are two ways to use Facebook messenger. You can use a phone app on any of the major device platforms, or you can access it through Facebook via a desktop client. The desktop client works either as a window in the side of a Facebook window, or in its own window, as on this link.
If you want to be available to your potential customers and the people looking to your site for help, it’s a tricky proposition. You need to refer people over to messenger or to your Facebook page, neither of which are necessarily the route a customer in need of help wants to take. If only there was some way you could embed the Facebook messenger on your website, like one of those little chat pop-ups…
Here are five options you can use to embed Facebook’s messenger app into your website, to reach customers where they’re already reaching out to you.
1. WhatsHelp
WhatsHelp is named after one of the biggest messaging competitors to Facebook’s messenger, WhatsApp. It’s a widget you can plug into your website which will allow a user to reach out and connect via a wide range of possible communications options, aimed primarily at mobile users.
WhatsHelp actually has a lot of different services available. The one we’re primarily looking at is the free chat widget, but they also do chatbots and even ads through Facebook Messenger. Think of these as advanced features. You can start off with just a messenger client, and add on a bot or ads if they’re worth expanding your functionality.
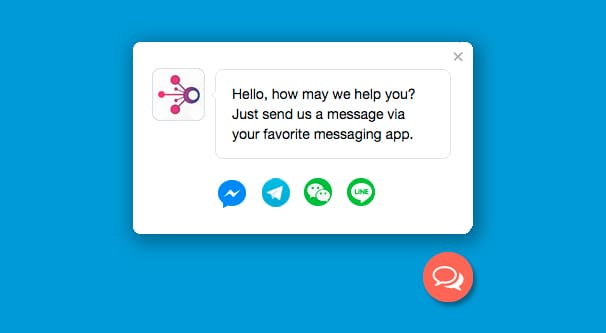
The widget, once installed on your site, will reside in a small button in the corner of the user’s screen. You’ve seen them before; they trigger a small window with a call to action once the user has scrolled far enough or spent enough time on the site. It’s generally a small message window for a chat program, and WhatsHelp is no different.
With WhatsHelp, you get this small window with a message. It’s a call to action asking the user to reach out via one of your supported contact methods if they’re in need of assistance of any sort.
What contact methods are available through WhatsHelp? By default, you have Facebook Messenger and WhatsApp. You can also add in Viber, Snapchat, Line, Telegram, Vkontakte (VK), and the standard methods of contact of SMS, phone, and email.
Once you have chosen your ideal message platforms and added in your contact information for them, you can customize the button. You can add your company logo, or it will pull your Facebook page logo if you use FB messenger and don’t customize the widget. You can change the message, the color of the button, and whether it’s on the left or right side of your page. Finally, you plug in your email and they send you the code.
WhatsHelp is a completely free plugin for you to add to pretty much any website. Just know that you may have to adapt the code to work with your CMS, if you use WordPress or Joomla rather than a more custom solution. I’m honestly not sure if they provide variations in their code for different CMSs or not.
WhatsHelp makes their money with the advanced features I mentioned above. The widget alone will allow a user to reach out to you, but if you don’t have someone at the other end of the line monitoring that communications method, they’ll get no response. A chatbot can help eliminate that problem – we covered them here – but it’ll cost you. Obviously, they have a ton of nice features, but pricing starts at $29 per month for up to 1,000 contacts. More contacts means more cost.
2. The Default Facebook Option
If you want something without all the different contact options, and you want it to look as officially Facebook as possible, you’re in luck. Facebook actually has two possible methods you can use, one designed more for desktop platforms and one for mobile.
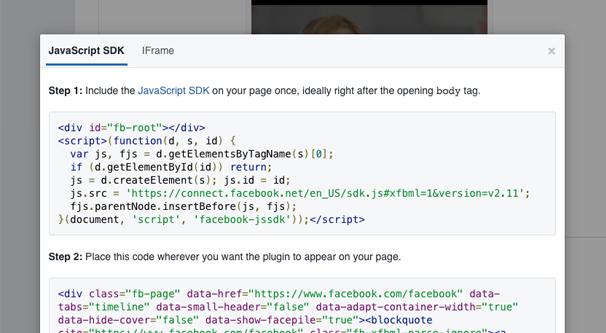
The desktop platform option is the messenger box. This is actually the same plugin as the Facebook timeline box or like box, and can actually have all options at once. Let’s take a look.
Known as the Page Plugin, you can see a live preview of the plugin as you customize it. By default, you see the box as it is with standard settings. At the top you see the name of the page and its follower count, the cover photo and profile picture displayed together, and a string of people who like it. Below that is a feed of the timeline of the page. This is almost all customizable.
First of all, in the box above where it says Tabs and is pre-filled with “timeline”, add a comma, space, and the word “messages”. Click outside of the box or hit enter and the preview will change. Now you see a second tab of “messages” in the widget. If all you want is messages, you can remove the timeline option. If you want more options, you have more. Here are all the possible parameters:
- href: the URL of your Facebook page. Don’t change this.
- Width, height: the dimensions of the plugin. You can set it to be fixed, between 180 and 500 in width, and a minimum of 70 height with no listed maximum.
- Adapt_container_width: this tells the plugin to change sizes based on how wide the DIV on your site is that contains it, so you don’t stretch or warp your site design and so it plays nicely with responsive designs.
- Tabs: these are the possible data options. You can see the timeline, messages, or events from the page, or all three. For our article all we care about is messages.
- Hide_cover: this allows you to show or hide the cover photos. Profile picture is required.
- Show_Facepile: this is the list of friends who follow the page, if the timeline option is chosen.
- Hide_CTA: this allows you to show or hide a custom CTA for the messenger tab.
- Small_header: this scrunches down the top header bar to leave more space for the meat of the plugin. I recommend it for messenger purposes.
Once you have the plugin configured the way you want, you can click the “Get code” button below it and copy the code you see. You can then add this to your site the way you would add any other custom plugin.
As for the mobile option, it’s a lot simpler. In fact, all you need is a link, the same as any other link you would want to add to your site. Messenger uses a custom m.me domain for shortlinks. So if I wanted you to be able to message Moz on Facebook, I would go to their Facebook page, which is Facebook.com/moz. All I need here is their page URL name, which is the /moz part. Then I can just create a custom link that looks like this: https://m.me/moz. Click that link and Messenger will open with a box for Moz. You can do this with any page, you just need their /username. You can also do this with individuals, though I’m not sure if you want to make your CEO’s profile open for messaging at all hours.
You can use a JavaScript button to do the same thing. The code is in option B on this page if you want.
3. Facebook Messenger Live Chat
There seems to be a WordPress plugin for everything, and this is no different. This plugin is one of the better options available free in the plugin directory. It’s very recently updated as of this writing, which is one thing I look for in a good plugin. It has over 10,000 active installations and a five star rating.
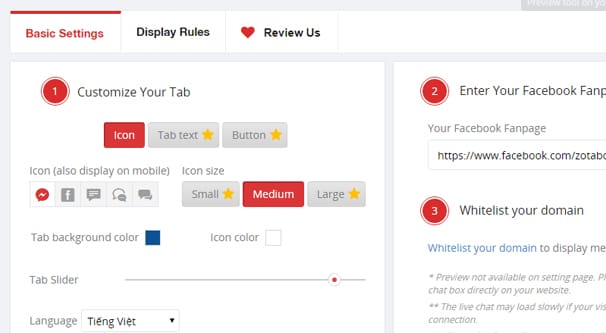
It’s not a very complex plugin, this one. It’s one of a handful of free tools offered by Zotabox, which include a contact for, a promo bar, a notification box, and social sharing buttons as well as the messenger button.
This plugin has the benefit of being simple and easy to install on WordPress. Otherwise, it looks and feels a lot like option #1 from this list. It also has a variety of different options, including choosing specific pages for it to appear or not appear, changing colors and other CSS options, and more. You can play around with a live demo of the plugin here.
There are several other options available in the WordPress plugin directory, but make sure to read the recent reviews and support threads before you choose one. I was going to recommend a different plugin, but it turns out it hadn’t actually been updated to use the new format of Messenger, and thus it stopped working for a lot of people. Facebook loves to make unannounced changes and break third party plugins, so always do your research first.
4. Facebook Messenger for WordPress by NinjaTeam
It’s hard to get through a plugin discussion without at least having one option from the Envato marketplace network. This CodeCanyon option costs $25 and only includes six months of support, with additional supporting running almost $8 per year. It’s a paid plugin, so what do you get in comparison to all of the above options?
First of all, you get both the old version of Messenger and the new version. Obviously Facebook is pushing people towards the new one, but if you want to keep the feel of the older version, you can. Both are included with a single purchase.
Scanning through the features list, there’s not much that makes this plugin stand out. It adds an icon, it can be positioned in various locations around your site, it can be translated into any language Facebook supports; these are all standard features.
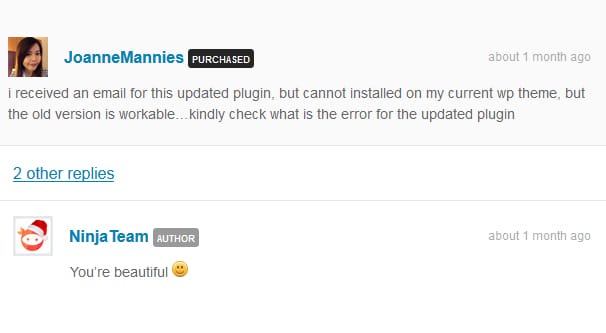
The fact is, unless you’re a huge fan of NinjaTeam, there’s nothing to set this plugin apart. Someone even asked in the comments for this plugin, how is it different from the free one on the WordPress plugin directory? NinjaTeam’s response is simply “they have the same function, different in style and shortcode.” So, that’s it. There’s nothing to make it stand out, other than their professional support:
5. A Custom Solution
If you’re really interested in a custom solution, you can do that too. This is the option for those of you who consider yourselves developers, who like to customize every little bit of code they use, and who absolutely do not want a simple out-of-the-box solution. I don’t know why you would want all this, but hey; you do you.
The linked tutorial is from DaddyDesign and starts with the basic Facebook Messenger link, as I mentioned up above. It’s the m.me link I had you make if you wanted to use that route. Make a simple HTML link to the m.me link with whatever anchor text you want for your messenger call to action.
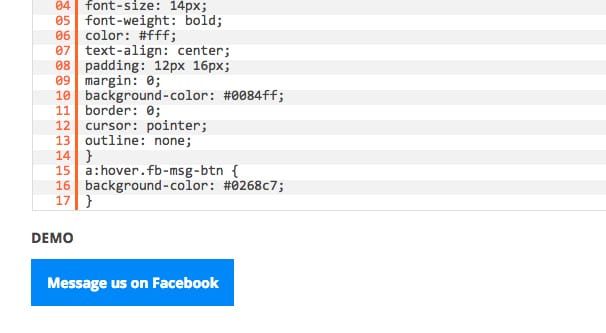
After that, you need to add custom CSS to the button. You need to specify a class for the link, something like “class=”fb-msg-button”” or whatever you like. Just make sure it’s something well labeled, so you never lose track of what you’re editing.
After that, you can play around with the CSS as much as you like. You can do all kinds of things, from rounded corners to animations with modern CSS. That link provides you with a few options to make a custom button, which you can use as a starting point if you like.