Written by ContentPowered.com
Facebook has millions upon millions of people on it, and not all of them like you. In fact, most of them are completely ambivalent in every way. They don’t know who you are and don’t particularly care. Of the small subsection of people who do know you, sure, most of them probably don’t mind you, or maybe even like you. A few, though, are probably irate.
Irate people on Facebook tend to cause problems. Now and then you’ll see people crop up with a seeming vendetta against someone, either a person or a business. They take it upon themselves, they make it a personal mission in life, to be as disruptive as possible. Perhaps their small-minded lives lead them to believe they’re making a difference, or perhaps they’re just getting catharsis out of it. Every like on one of their posts is validation of their anger and keeps them going. Every antagonistic comment just fuels their push.
This is why blogs close their comments sections. This is why Facebook pages block people. This is why personal profiles lock down their privacy. If you’re looking to stop someone – or everyone – from posting to your Facebook account, here are the ways you can do it.
Stop Everyone From Posting on a Profile Timeline
This is the overkill solution for locking down a personal profile. If you’re being abused or stalked, it’s difficult to block everyone, particularly since some of them will keep making new accounts to harass you. This comes up a lot with women in prominent positions online; they’re constantly harangued for existing and being female, and they need some reasonable solution.
If you want to stop everyone from posting on your profile timeline, but you don’t want to completely lock down your profile, this is what you do.
- Click the triangle drop-down in the top right corner of Facebook.
- Click the settings option from that menu.
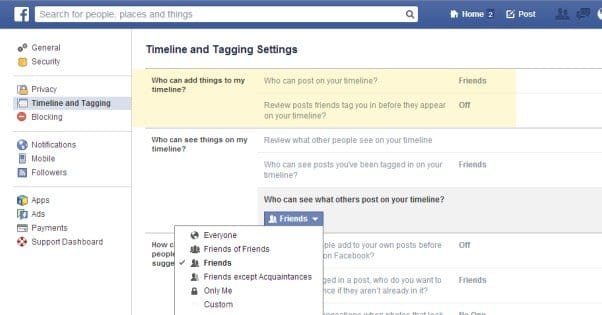
- In the left-hand column of settings sections, click the timeline and tagging option.
- Look for the setting labeled “who can post on your timeline?” and click to edit it.
- Set the “only me” option so that you alone are able to post to your timeline.
One thing to note is that this setting still allows friends to comment on any visible post. This only gets rid of the ability to post something directly to someone’s timeline.
Editing Profile Visibility
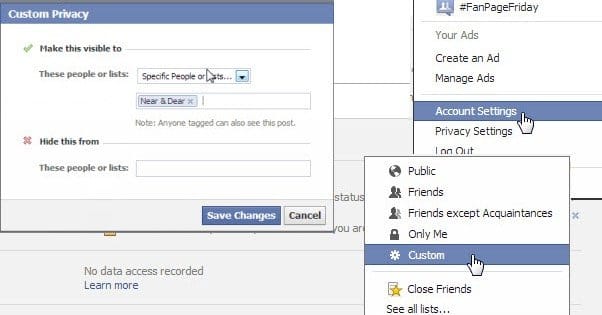
If you find that allowing people to comment on specific posts is detrimental, you can set those posts to a custom visibility setting. Every post has an icon underneath your name, next to the date information. You can click the drop-down arrow and change the settings for the post.
- Everyone. This post is visible to everyone on Facebook and even unregistered users, though only registered users can comment on it.
- Friends. This post is visible only to your friends, and only your friends can comment on it.
- Only Me. This post is invisible to everyone but yourself. Useful for saving data for later or for hiding posts from apps.
- Groups. You can make a post only visible to members of a group to which you belong. Be aware that groups can include workplaces or locations, as well as “family” specifically.
- Custom. You can click the custom button to create a list of people to tag to suggest the post to them. You can also, in this same menu, exclude specific people from your post. This blacklist is invisible and does not notify the user, though that user can still see the post if you choose to tag them on it.
That works on a per-post basis, but you can go further.
You can set the privacy settings of your entire account. To do this, you will have to go back to your settings menu, this time clicking the privacy option to the side.
- The “who can see my stuff” option is identical to the options above for individual posts. This is just a place where you can set the default; you can still change it on a post-by-post basis whenever you like.
- You can click to limit all of your past posts. This feature will change all posts older than a certain time to friends only. This is a great option if you want to hide old embarrassing posts.
- You can change who can send you friend requests, who can look you up via email, who can look you up via phone, and whether or not your profile is indexed by search engines all in this option as well.
In the same settings menu, if you check the blocking section, you will be able to see and manage your blocking settings. This is where you can see and block or unblock users on an individual basis, or block the ability of certain people to message you. You can block app invites from individual people, and the same with events. You can block apps – and may have several blocked already if you didn’t like constant Farmville invites – and you can block pages entirely. All of this is managed from this one settings pane.
Facebook Page Settings
Don’t worry, marketers, I didn’t forget about you. Pages work in a slightly different way. For one thing, posts made to your timeline as a page aren’t shown in the main timeline, only your posts or posts you share are. This allows you to keep your timeline more focused. However, there is a specific section for visitor posts, appropriately titled “visitor posts” on the left side of the timeline. It’s narrow and has a short character limit.
There’s a good reason it’s not displayed in the main feed. Just look at Coke for example. The posts to their page are insipid at best. You have someone who tagged every brand of every product they’re having at a picnic, you have someone posting about Armageddon and World War 3 for 1,000 words. You have people advertising affiliate links. You have people complaining about vending machines not working properly. Maybe one in fifteen posts is actually something relevant to the business, and Coke does the right thing by ignoring basically all of it.
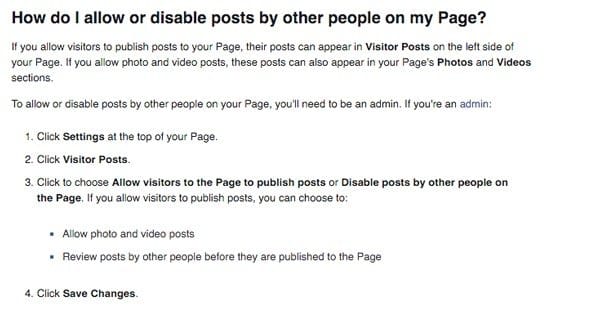
If you want to disable visitor posts, you will have to sign into Facebook as your page. You have to be an admin, though you don’t need to be the actual creator of the page. When you’re using Facebook as your page, you need to click settings and click visitor posts. Here you can change the setting to “disable posts by other people on the page.” This disables all posts made by users, though it does not disable comments on posts you make.
If you do choose to allow users to post to your page, you have options. You can choose to allow or disable photos and videos posted to your page. You can also choose to require review before any posts are actually posted to your page publicly. Coke apparently allows everything and does not review it, judging by posts that look like this. I, for one, would have filtered that out.
Pages are distinct from profiles in that you do not have the option to disable comments on the posts you make. Facebook wants their site to be a two-way social street, so they don’t allow one-way broadcasting in that fashion. However, there are a few moderation options you have.
For one thing, whenever someone comments on a post you’ve made, you can hover over the post and click the X that appears in the corner. This will hide the comment from public visibility; only the poster and their friends will be able to see it, but not the rest of Facebook at large. Additionally, when you click the X, you are given the option of deleting the comment entirely and optionally banning the user. This is important for moderation to minimize the potential impact of irate ex-customers.
Another option is the blacklist. If you go into your page settings and click the moderation section, you can type or paste in a list of words that you don’t want to allow on your page. Vulgarity, racist epithets, and common spam terms are all good ones to disallow. If a user tries to comment using a blacklisted word, their comment will not be accepted.
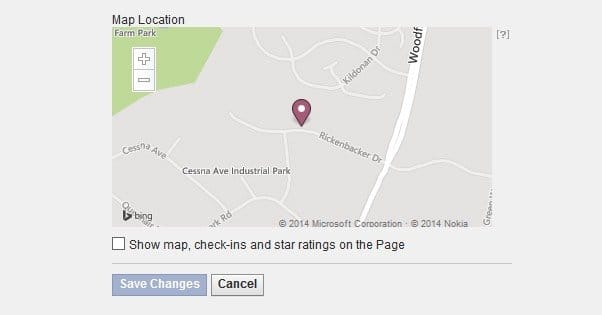
If you have a local map up as a widget on your Facebook page, you also have local check-ins and reviews enabled. These two are peas in a pod, they cannot be separated. You cannot disable reviews without also disabling your star rating and your map. If a spammer or irate customer decides to leave a vulgar or spammy review, you can deal with it.
It should be noted first, though, that you cannot flag and delete reviews yourself. Facebook doesn’t want to give businesses the ability to filter out all negative reviews. In order to get a spam review removed, you have to visit the actual review itself and click the drop-down menu. In this menu is an “I don’t like this review” option. Click it and follow the instructions that appear to report the review. Facebook will look it over and decide whether or not it should be deleted.
Now, I already covered how to ban someone from your page if they posted a comment and you remove that comment. There are other was to ban a user, though.
If the user likes your page but has not posted, you will need to find them in the “people who like you” page. You can click settings and click “people and other pages” in the left sidebar. There will be a gear icon next to the person you want to ban; click it and select ban from page. Confirm your ban and they will be removed from following you. They will also be barred from following you again. This is useful for getting rid of fake followers as well as spammers or harassers.
If someone has sent a message to your page and you want to ban them from the page entirely, you need to navigate to the message they sent you. To the left of the message is a gear icon; click it and select ban from page. This bars them from the page and disables their ability to send you messages.
You can also ban people who abuse the visitor posts section by going to that section, finding a bad post – most of them will be bad – and deleting the post. Just like comments, you’ll be given the option of banning the user who made it. The same goes for posts your page has been tagged in but which were not made directly to your page; they show up in the visitor posts section as well.
Aggressive Moderation
There are three strategies for moderating page engagement. One is to ignore it completely, like Coke more or less does. This turns your “visitor posts” section into a honeypot of bad posts, and ideally keeps them off of your comments. It doesn’t quite work out like that, but it does draw some away from more visible areas of the site.
The second is the opposite; hyperaggressive moderation that removes anything and everything. I’ve seen a few pages try to “disable” engagement by deleting any post they get. This plainly doesn’t work very well, it’s tedious and time consuming, and there’s no purpose to it. Engagement is good, just not spam.
The third is the most reasonable, just removing spam and addressing negative issues quickly through customer service messages. It’s also, unfortunately, the most time consuming and expensive of the three routes. This is why Coke has a handful of posts on their pinned video, but ignores their other comments and their visitor posts section. It’s just too much expense to be worth it for a company with that many followers.
Picking a moderation style is important. A few spam posts look bad when they’re all you have, but it’s also hard to grow if you attempt to lock down all engagement. You need to find a middle ground that works for you.